수식을 계시판에 쓴다는 것은 매우 어려운 일이다. 이러한 것을 가능하게 한 게시판이 있으니 바로 TinyMCE 에디터에 플러그인을 설치해서 쓸수가 있다. 아래의 그림을 보자.

수식이 들어 가게 된다.
우선 제로보드를 설치하고 그 위에 에디터 위젯 tinyMCE를 설치를 하자.
그리고 아래의 파일을 우선 다운로드
zip format 또는 tar.gz format
그러면 아래의 예제를 실해하여 볼 수 있다.
참 좋은 세상이다.
이제 셋업을 하여보자.
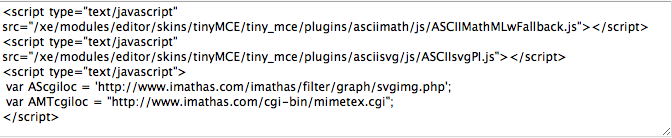
1) 제로보드 XE에서 레이아웃에서 레이아웃 설정에서 해더스크립트를 입력하여야 한다.

헤더 스크립트에 아래와 같이 입력을 한다.
2)다운로드 받은 /jscripts/plugins/ 밑에 있는 /asciimath 과 /asciisvg 폴더를
/xe/module/editor/skins/tinyMCE/tiny_mce/plugins/ 폴더에 복사를 한다.
3) asciisvg, asciimath, asciimathcharmap 버튼을 추가하여야 한다.
이것은
xe/module/editor/skins/tinyMCE/js/xe_interface.js 파일을 수정하여야 한다.
tinyMCE.init 아래의 plugins를 수정하여야 한다.
plugins : "safari,pagebreak,style,layer,table,save,advhr,advimage,advlink,emotions,iespell,inlinepopups,insertdatetime,preview,media,searchreplace,print,contextmenu,directionality,fullscreen,noneditable,visualchars,nonbreaking,xhtmlxtras,template,wordcount,safari",
를 asciimath,asciisvg,table,inlinepopups 를 뒤부분에 추가를 한다.
plugins : "safari,pagebreak,style,layer,table,save,advhr,advimage,advlink,emotions,iespell,inlinepopups,insertdatetime,preview,media,searchreplace,print,contextmenu,directionality,fullscreen,noneditable,visualchars,nonbreaking,xhtmlxtras,template,wordcount,safari,asciimath,asciisvg,table,inlinepopups",
으로 수정하면 됨
4) 바로 아래에 있는 theme_advanced_buttons3 : 수정을 하여야 한다.
theme_advanced_buttons3 : "tablecontrols,|,hr,removeformat,vasualid,|,charmap,emotion,iespell,media,advhr,image,|,insertlayer,moveforward,movebackward,absolute,|,attribs,|",
를 맨 뒷부분에 asciimath,asciimathcharmap,asciisvg를 추가하여
theme_advanced_buttons3 : "tablecontrols,|,hr,removeformat,vasualid,|,charmap,emotion,iespell,media,advhr,image,|,insertlayer,moveforward,movebackward,absolute,|,attribs,|,asciimath,asciimathcharmap,asciisvg,|",
으로 수정한다.
5) contens.css 가보이는데 그 위에
//plugins : 'safari,asciimath,asciisvg,table,inlinepopups',
//여기도수정함
AScgiloc : 'http://www.imathas.com/editordemo/php/svgimg.php', //change me
ASdloc : 'http://www.imathas.com/editordemo/jscripts/tiny_mce/plugins/asciisvg/js/d.svg', //change me
이것도 추가한다.
아래 그림이 이 모든 것이 다 수정된 상태이다.

6) 이번에는 /xe/module/editor/skins/tinyMCE/tiny_mce/themes/advaced/skins/default/contents.css 파일을 찾아 에 맨 뒷줄에
span.AMedit {
border: 1px solid #ff0000;
}
를 추가한다.
이제 게시판에 tiny_mce 에디터를 선택하고
글 쓰기를 하여 보자.

버튼3 오른쪽에 있는 첫번째 버튼을 누르고 위와 같이 즉 latex 처럼 입력을 하면,

위에 처럼 바로 처리가 됩니다. 저장을 하고

이렇게 게시물이 올라가집니다.
주의할것 있는데 여기서 tex으로 컴파일을 하여야 하는데 맨 처음 1번 레이아웃에서 마지막 스크립트를 보면 홈페이지 주소로 되어 있습습니다. 이것을 내 서버에 mimetex을 설치를 하고 그 주소로 바꾸워 주면 됩니다.
그런데 mac에서 mimetex은 또 어떻게 설치를 하여야 하나.......... 또 서버에서는 어떻게 설치를 해야하나 걱정이네요.
이거 원 넘 해결해야 할 것들이 매우 많네요.
또한 수식은 latex을 공부하세요. latex으로 구문을 입력하게 되어 있습니다.
그럼 좋은 결과가 있으시길 바랍니다.